Business System Setup
The Business System workspace is used to maintain Transaction Manager business system and company integration settings.
To access these settings, select Transaction Manager > Business System on the Foundry Menu. This launches the Business System Setup page which lists one or more business systems that have been configured for use with your Transaction Manager implementation via Business System Plug-in (BSP).

The Business System Setup page is divided into two panels. Select the 1 business system on the left side of the split workspace to display the associated 2 BSP version number and company listed on the right.
Click on the 3 company name to launch the associated Business System Company Setup page.
Click on an 4 EDI ID (SSA ID) below the company name to access the Company EDI Setup page.
|
NOTE Most organizations will only be working with one business system company integration, which would be selected automatically when you first open this workspace. The Hide Business System Plugin checkbox (right panel) can be used to hide a BSP that is not in use, provided that option is enabled in System Configuration. |
Business System Company Setup
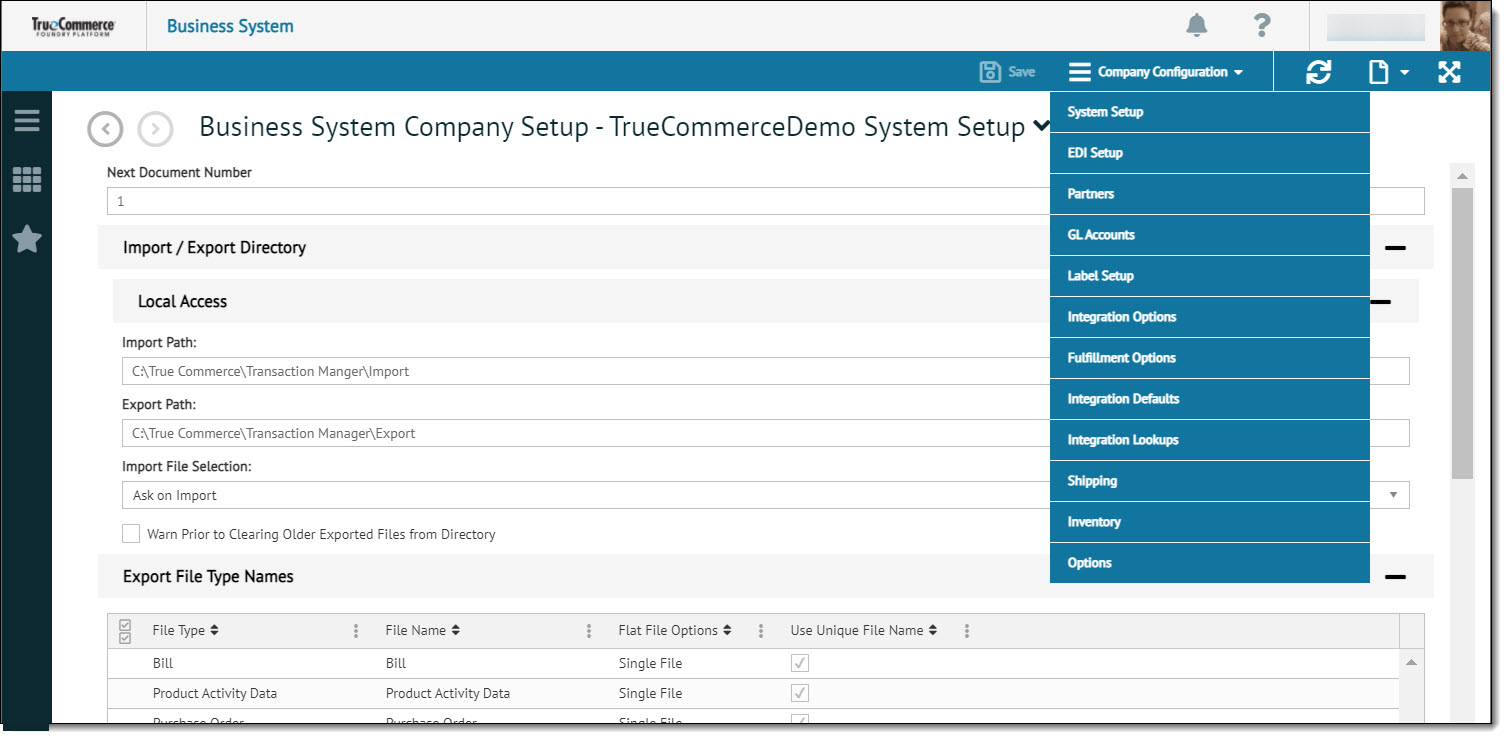
Business System Company Setup is the main work area for maintaining your company configuration. The System Setup page opens first by default. Note that some fields on this page may be integration specific. If so, refer to the documentation supplied with your Transaction Manager implementation for further details.

From here, you can select options via the Company Configuration dropdown menu to access the various configuration pages associated with the company you selected on the initial Business System Setup page.
Company Configuration
The Company Configuration dropdown control is enabled on the action bar when you open the Business System Company Setup. Note that the standard platform controls (on the far right of the action bar) are documented in the Foundry Platform User Guide.
Select an option to open the associated configuration page:
|
System Setup |
Select System Setup to maintain import and export settings.
|
|
EDI Setup |
Select EDI Setup for options to choose the EDI IDs that will be used by the company selected.
|
|
Partners |
Select Partners to access your list of EDI Partners. See also Managing Trading Partners for more information.
|
|
GL Accounts |
Select GL Accounts to access accounts receivable/accounts payable and general ledger settings. This information is used by Transaction Manager when communicating with your business system.
|
|
Label Setup |
Select Label Setup for TrueCommerce label configuration settings. From here, you can specify on-premise or web-based labeling configurations.
|
|
Integration Options |
Select the Integration Options page to access configuration options associated with your business system integration.
|
|
Fulfillment Options |
Select the Fulfillment Options page indicating the associated fulfillment package and associated plugin version with options to create detailed or summary warehouse shipping advice.
|
|
Integration Defaults |
Select the Integration Defaults page to display the Transaction Manager defaults for specific transactions. This information serves as a template for specific fields and is generally defined at initial setup. They can be sorted by All Defaults, Business System Defaults, Shipping Defaults and FulFillment Defaults.
|
|
Integration Lookups |
Select the Integration Lookups page for access to the lookup tables used to translate data between Transaction Manager and your business system. This information serves as a template for specific fields and is generally defined at initial setup. The selected lookup type can be sorted by All Defaults, Business System Defaults, Shipping Defaults and FulFillment Lookups. |
|
Shipping |
Select the Shipping page to access default shipping fields for your business system. See also Transaction Manager Shipping for more information
|
|
Inventory |
Select the Inventory page to access the Import Inventory Directory.
|
|
Options |
Select the Options Page for various settings and preferences related to automatic list updating, flat file batching, and grid page sizes.
|
Company EDI Setup
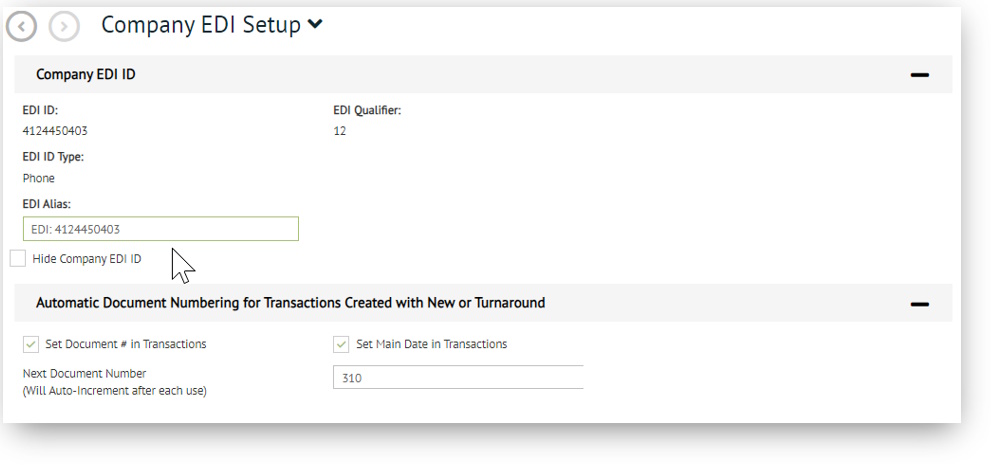
There may be one or more EDI IDs (ISA IDs) listed below the company name. Clicking on an EDI ID number opens the Company EDI Setup page.

From here you will be able to replace the EDI number with an EDI Alias name to better identify and distinguish between different IDs. The Hide Company EDI ID checkbox can be used to hide the EDI ID from display, provided that option is enabled in System Configuration. Other options allow you to configure document numbers specific to the selected EDI ID.
What can I do?
-
Configure various import and export settings via System Setup
-
Define general ledger account settings via GL Accounts
-
Establish labeling setup details and preferences via Label Setup
Related Topics